Mermaid Decision Tree Flowchart: Build Yes/No Diagrams Fast
Learn how to create decision trees in Mermaid using flowcharts, yes/no branches, subgraphs, labels, styling, and copy-paste examples for docs and product workflows.
# Mermaid Decision Tree Flowchart: Build Yes/No Diagrams Fast
Decision trees are one of the most useful diagrams for developer docs, product specs, runbooks, and support playbooks. They answer a practical question: what should happen next?
Mermaid does not have a separate "decision tree" diagram type, but its flowchart syntax is perfect for the job. You can create yes/no branches, label conditions, group sections with subgraphs, and keep the whole diagram in Markdown where your team can review it like code.
This guide shows copy-paste Mermaid decision tree patterns you can use immediately.
Basic Mermaid Decision Tree
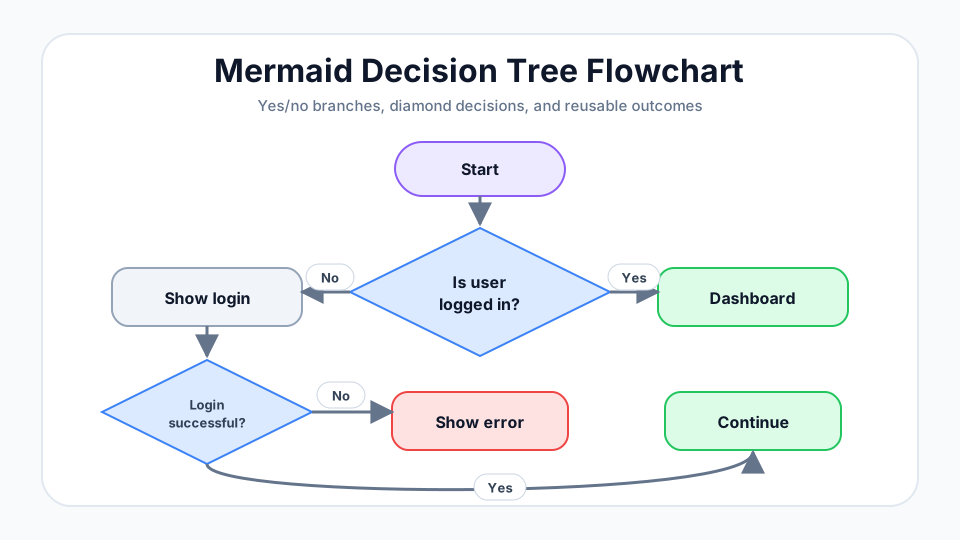
Start with a top-to-bottom flowchart and use diamond nodes for decisions:
flowchart TD
    Start(["Start"]) --> Q1{"Is the user logged in?"}
    Q1 -->|Yes| Dashboard["Show dashboard"]
    Q1 -->|No| Login["Send to login page"]
    Login --> Q2{"Login successful?"}
    Q2 -->|Yes| Dashboard
Q2 -->|No| Error["Show error message"]The key pieces are:
- flowchart TD for a top-down tree.
- {"Question?"} for a diamond decision node.
- -->|Yes| and -->|No| for labeled branches.
- Reused node IDs like Dashboard when multiple paths end in the same place.
Product Qualification Decision Tree
Decision trees are excellent for product onboarding and lead qualification because each branch narrows the next step.
flowchart TD
    A(["New signup"]) --> B{"Has a company email?"}
    B -->|Yes| C{"Company size > 50?"}
    B -->|No| D["Start self-serve trial"]
    C -->|Yes| E["Route to sales demo"]
    C -->|No| F{"Invited teammates?"}
    F -->|Yes| G["Show team onboarding"]
F -->|No| H["Prompt invite workflow"]Use short branch labels. A decision tree should be scannable; if a branch label becomes a sentence, move detail into the destination node.
Troubleshooting Runbook Decision Tree
For operations docs, a decision tree can turn tribal debugging knowledge into a repeatable process.
flowchart TD
    Alert(["API latency alert"]) --> Metrics{"Error rate also high?"}
    Metrics -->|Yes| Logs["Check application logs"]
    Metrics -->|No| Infra{"CPU or memory saturated?"}
    Logs --> Deploy{"Recent deploy?"}
    Deploy -->|Yes| Rollback["Rollback latest release"]
    Deploy -->|No| Incident["Open incident and inspect dependencies"]
    Infra -->|Yes| Scale["Scale service or investigate hot path"]
Infra -->|No| Network["Check upstream network and database latency"]This kind of diagram is especially useful in incident response because it removes hesitation. People can follow the path under pressure.
Use Subgraphs for Larger Decision Trees
When a decision tree grows, group related steps with subgraph. This helps readers understand ownership or phases.
flowchart TD
    Start(["Support ticket received"])

    subgraph Triage["Triage"]
        Start --> P1{"Is the user blocked?"}
        P1 -->|Yes| Escalate["Escalate priority"]
        P1 -->|No| Classify{"Bug, billing, or how-to?"}
    end

    subgraph Routing["Routing"]
        Classify -->|Bug| Eng["Send to engineering queue"]
        Classify -->|Billing| Billing["Send to billing team"]
        Classify -->|How-to| Docs["Send docs and examples"]
        Escalate --> Manager["Notify support manager"]
endSubgraphs should clarify the diagram, not decorate it. Use them for phases, teams, systems, or policy boundaries.
Styling Important Outcomes
Mermaid classes make it easy to highlight success, warning, and failure outcomes.
flowchart TD
    A(["Request received"]) --> B{"Valid token?"}
    B -->|Yes| C{"Has permission?"}
    B -->|No| D["401 Unauthorized"]
    C -->|Yes| E["200 OK"]
    C -->|No| F["403 Forbidden"]

    classDef success fill:#dcfce7,stroke:#16a34a,color:#14532d;
    classDef warn fill:#fef9c3,stroke:#ca8a04,color:#713f12;
    classDef fail fill:#fee2e2,stroke:#dc2626,color:#7f1d1d;
    class E success;
    class F warn;
class D fail;Use styling sparingly. Highlight the outcomes that matter most rather than coloring every node.
Decision Tree Best Practices
- Put the question inside the diamond node.
- Label every branch with a clear condition.
- Keep each node short enough to read at a glance.
- Prefer top-to-bottom layout for yes/no trees.
- Reuse endpoint nodes when multiple branches share the same outcome.
- Split very large trees into multiple diagrams.
- Store the Mermaid source in the same docs page as the explanation.
Quick Template
Copy this starter template and replace the questions and outcomes:
flowchart TD
    Start(["Start"]) --> Decision{"Question?"}
    Decision -->|Yes| YesPath["Yes outcome"]
    Decision -->|No| NoPath["No outcome"]
    YesPath --> Next{"Another question?"}
    Next -->|Yes| FinalA["Final outcome A"]
Next -->|No| FinalB["Final outcome B"]Paste it into MermaidEditor.lol, edit the labels, and export the finished decision tree as SVG or PNG.
Final Recommendation
Use Mermaid decision tree flowcharts whenever a reader needs to choose the next action: onboarding paths, troubleshooting runbooks, permission checks, product logic, support routing, and documentation workflows.
The biggest advantage is maintainability. A decision tree written in Mermaid is easy to diff, easy to review, and easy to keep current as the rules change.